Wednesday 21 December 2011

Pagans Unite

So, forget all this modern rubbish: Father Christmas in red (Coca-Cola invented that in the 30's); Christingle (goodness knows where that one came from); indoor greenery; cards; gluttony...

Going back to basics - today is the Winter Solstice, the shortest day - the real reason Stonehenge was built. The Sun returns tomorrow - no not the newspaper - that bright shiny thing we don't see too much of in this country. The nights start to draw out again, and summer is on its way.

Of course its perishing cold outside, and damp, so Huntsman 31 rebuilding occurs in the workshop - some of which is shown in the photograph. I calculate about 1% of the detritus in the workshop is in shot.

Most importantly; the fridge box (partially completed) at the bottom, awaiting yet more sanding and resin coating. Top centre is the rebuilt (to modern requirements) secondary electrical panel which will sit in the companionway within reach of the helmsman and provides the main electrical controls for the engine and ancillary equipment like navigation lights; screen wipers etc.

The wiring diagram on the wall is for the aluminium runabout - and copied from an MG-B Haynes manual - don't ask - and nothing to do with the Huntsman, its just that the blue-tack holding it to the wall will probably bring the plaster off if I try to remove the diagram.

Next job is to fit the 2" (50mm) insulation to the fridge box.

So - whether you worship the Sun; Capitalism or other Deity, have a great time. See you in the New Year.

Have a good one...

[Now Playing: Ring Out Solstice Bells (2003 - Remaster) by Jethro Tull]

Wednesday 30 November 2011

Winter Drawers On

So, the end of November is upon us (and still no offers of Pantomime).

Here is the final shot of the deck for the year. Five strakes reach from stem to stern, with more than a few yet to fit. The side decks are almost complete, two bits of teak on each side would have completed them, but the temperature is getting too low for the glue to cure quickly and the rising humidity will also cause problems.

Its time to fit the winter cover and hibernate in the workshop to finish the galley cabinetry, fit the fridge; cooker and sink and get those engines reassembled.

Every time I meet a friend, the usual first question is; "when are you launching the boat?" I usually reply, "Two more years". Looking at the To-Do list; there's the deck still to finish; the windows to refurbish and refit; the engines to rebuild and the gearboxes to check over. The wiring needs total replacement and the galley and heads compartments aren't compartments at all, they're just big areas of boat.

and then there's all the little jobs...

Who'd have thought a teak deck would have taken so long and so much hassle. Hey-ho, you live and learn.

Right - off to the shed to start clearing it out ready for carpentry operations.

[Now Playing: And Winter Came by Enya]


Tuesday 1 November 2011

Laying up supper; GMT and Halowe'en

Not much blogging lately. There's been steady progress on the deck, but I guessed you'd all be bored witless by yet another picture of what looks ostensibly like the same piece of deck.

The unseasonable weather for October started with temperatures in the 80's and a trip on the P.S. Waverley from Whitstable to Tower Pier as a 21st Wedding Anniversary treat for the long suffering SWMBO. But the rest of the month meant that most days a strake or two could be glued down. I'm getting to the awkward pieces now - spiling into the cabin side and odd short lengths on the foredeck means that each strake takes about two hours to lay. Compare this with earlier in the job and four planks at a time fitted and glued in a single session of about 3 hours. Oh well.

Saturday was our club AGM and laying up supper at a sailing club on the Hamble. Most enjoyable to meet like minded nutters and remind oneself why one spends so much time restoring these old beasts.

A slight shock on Sunday as the most of the clocks in the house set themselves back an hour - the cooker and heating system didn't manage it of course, and now it's dark at five PM and time to hibernate in the workshop - which is unfortunately a total tip, filled with short ends of teak and glue boxes and... I suspect the next rainy Sunday afternoon is reserved for mucking the place out.

Time, I think, to start concentrating on the electrical drawings and finalising the circuit specifications - but first, a cup of tea...

[Now Playing: And Winter Came by Enya]


Monday 3 October 2011

Mambo No. 4


Crunch time. As per previous posts, it has become blatantly obvious that there was no way that 45mm wide teak strakes were going to bend to the original curve used by Fairey Marine. You can see the traces of the old planks - they're the black marks in the sub-deck.

So, a decision was taken to reduce the sweep somewhat, but keep the original style of planking, i.e. butting into the flared king-plank.

The photo shows the port hand strake (No 4) persuaded into position with blocks on the deck; screws and penny-washers and a ratchet load strap to control the edge set.

One fine day in early October (temperature in the high 70's) Both number 4 strakes were laid; machined and glued down.

Of course No. 3 needs to be completed, and then the pieces of 1 and 2 fitted, but I'll leave those for another day.

On the basis that I've used up one of my two boxes of glue I am assuming that I've completed about 50% of the deck. I'm hoping that it's slightly more.


[Now Playing: Tourniquet by Evanescence]


Monday 26 September 2011

Getting there.

After two weeks of dodging the weather, the deck is progressing forwards. i.e there is more teak on the foredeck than there was.

It's like one of those difficult jigsaw puzzles, you can get so many bits in place, then you have to sort out an awkward piece before you can do some more. The awkward pieces in this case are on the foredeck where the edge set is greatest.

Fairey Marine must have steamed the teak in one of their autoclaves and then probably bent them on a jig to get the set. They probably used a thicker piece of wood and then once bent, sawed them into strips about 65mm wide and 10mm thick.

The photo shows a typical Huntsman deck on Fordsport 707. I can tell you that that bend cannot be done with dry teak even 55 mm wide. Steaming the strakes just mean they are slightly easier to handle into place and will retain the set afterwards, it doesn't seem to allow them to bend much further - at least with my steaming gear.

So, options: Lessen the sweep or invest in a bigger kettle.

Once I can get some of the foredeck strakes in place, I can finish the side decks, which look quite good.

The fight continues...


Friday 2 September 2011

Sticking to it

Right, stop messing about in boats and get back to messing about with boats.

The rally season is pretty much at an end for the small boats, and of course the weather will now improve as the kids go back to school.

Time now to get back down to the important stuff like laying teak decks.

I expect you're all bored silly by this project, but for those who are still with me; I managed over a few evenings this week to get teak glued to deck. The whole of the aft deck is glued down and the port quarter likewise. The next phase is the starboard quarter and then it's time to tackle the hard bits at the front.

The main problem with this stage is that the glue gets everywhere and makes the whole job look a mess, until its plugged and caulked and sanded.


[ Now Playing One Piece At A Time by Johnny Cash ]

Tuesday 2 August 2011

Boating Time

As you've probably noticed, not a lot of progress on the big boat. Mainly due to spending time on the working boat - well, it was working - but a trip to Windermere has managed to generate a long repair list.

One blocked carburettor; I've been chasing dirt round the fuel system for ages, but it finished up in the main jet, so there was not enough fuel getting to the engine. And then it moved to the float valve so we had it dripping into the carburettor which then flooded the engine. Famine or Feast.

One broken cleat: This happened when I tied the boat up to test the engine, which then decided to briefly produce full power - there was a bang and the starboard quarter cleat fixing gave way - and I'd only just repaired the port cleat which did exactly the same thing last season.

Then, to cap it all - we blew a trailer wheel bearing on the way home - luckily, fairly close to home so the Roadside Assistance were not wakened in the early hours of this morning.

But - for all the mechanical problems we had a  good time at the rally - I shall now go and extract the trolley jack.

[Now playing: Busted by Johnny Cash]


Tuesday 12 July 2011

The Aft Deck

The port aft deck.
One of the more fiddly areas is the aft deck. Lots of short pieces to cut and fit, each one taking about 20 minutes once the process is refined.

The upside of small pieces is that lots of short ends can be used up, along with the earlier failures and very occasional poor quality strake (just one so far).

The most useful tools for this job are: a decent cabinet maker's screwdriver; Starretts jig-saw blades which cut on the up and down-stroke and a 5mm drill which is not used to drill holes. Perhaps more on these later.

Just to be pedantic; there are eight separate processes:

  1. Measure and cut the piece to rough length
  2. Cut the mitre and bevel into the aft cabin panel
  3. Pick up the aft profile from the margin piece and cut.
  4. Lay in position and mark for at least two screws (three as you work into the middle of the deck)
  5. Accurately profile to the margin and any rosettes, and cut
  6. Counter bore the screw holes
  7. Open up the counterbores to 9.5mm for the plugs
  8. Screw down

and of course, it'll all have to come up again to prep the deck and glue down.

[Now Playing: Absolutely Nothing - I'm too busy concentrating]


Monday 27 June 2011

Too Hot to Glue

Hottest day of the Summer so far, and summer is only 4 days old in EU terms.

Too hot to glue after about 11am, so made a start on the starboard quarter deck. The margins were already in place (see Time for Thought)  so started on the strakes. These can be pulled into place by hand so don't require steaming. With the help of a couple of finger clamps and two self tapping screws and washers, they stayed put long enough to drill for the No. 6 brass screws. Once fitted, they are removed to machine the counter bores and trim the butt joins to give a 5mm gap which matches the rebate on the strake edges.

The bevel to the transom margin was easier to mark than I'd anticipated. I thought I might have to remove the margin piece.

The outer strake is 10 foot long, is cut to work round the cleat rosettes so probably stretches a little further. The second strake is about 3/4 length; the third 1/2 length etc. This ensures that the butt joins in the strakes are well spaced.

Strake number 5 has to fit round the cabin side and butt up against the transom margin - that will be interesting...

[Now Playing: Laid Out (Fully Horizontal Mix) by Danny Howells

Tuesday 21 June 2011

Go West Young Man

Absolutely no progress on the boat this weekend due to an invite to join the Devon Fairey owners care of Mr. Hansson, keeper of the Swordsman 33 on the left.

The weather was almost set to cancel the photo shoot at the weekend, but thankfully the wind dropped and the rain abated on the Sunday so we had an excellent run up from Dartmouth to Torquay on the Swordsman and back on board a famous racing Spearfish.

Due to the lousy weather, the Plymouth based boats couldn't join us, so we drove to Plymouth and did it all again. This time to see a Spearfish with a recently laid teak deck. Very similar to what I'm trying to achieve.

Thanks to one and all for a memorable weekend. I return to my Huntsman with renewed enthusiasm.


Music to drive Faireys to:-
[Now Playing: Smokebelch II by the Sabres of Paradise]   sorry Grant :-)


Monday 13 June 2011

Slow Progress

A frustrating week with real work and the weather getting in the way of progress. But a few odd jobs have been completed: here's the deck strake jig with its clamp blocks and fingers finished, stuck in the garage pending 3 hours without rain at the right time.

The other job which is small enough to fit in the workshop is the cool box for the galley. 5 bits of 9mm ply epoxied together to take the Cold plate of the chiller system. It's about half complete (photo in the gallery)

We did have a great day at the Beale Park Boat show though, always worth a visit for a nice day out by the water.

Now, back to work...

[Now Playing: Frustration by Soft Cell ]


Friday 3 June 2011

Twist and Shout

After my first attempt at steaming and fitting a teak deck strake, it became blatantly obvious that its:

a) hard work and

b) likely to do a lot of damage to existing deck components.

So I started scheming out a jig. After all, Fairey Marine used to supply a set of teak deck parts pre-steamed for customers to add to their kit boats. I bet they used a jig.

The Solution so far is a 8' x 2' sheet of 3/4" spruce plywood from "B&Q" and some 2" x 1" screwed and glued around the edge as a frame to stiffen the whole lot up. Add a coat of Homebase's finest white paint so I can see the lofting lines.

The curve of the strakes was easily traced from the old sub-deck as the lines of the old planks were visible due to the discolouration of the plywood caused by water leaking between the planks over the years. A few panel pins and my trusty lofting batten.

The next job is to make up the clamp blocks so the teak strakes can be manipulated (in pairs) to the correct curve.

More later...

[Now Playing Twisted by Katie Melua]

Monday 23 May 2011

Err; The Computer says "Yes".

The weather was a bit unsettled for working on the deck and I'm still waiting for some materials to be delivered, so attention is turned to the galley fit out.

Some time back, I generated a 3D computer model of the galley (see the photo album link) to gain some visual idea for the final result and to try out various changes without major expense.

I had wanted to gimbal the cooker and to allow for a 10 degree swing either way, the cooker surround needed to be a lot bigger than originally fitted.

At 10 degrees (the maximum I could work in) the computer model suggested that the cooker surround (the big box in the middle of shot) would foul the hull around the chine log. Sure enough, when moving the box into position it stopped short by about 30mm. The box was removed and a 50 x 50 bevel planed off the bottom corner allowing the box to be fitted in its correct position.

Of course I now need to fill in the hole and fit the framing, but it's nice when the computer is right for once :-)

The photos shows the state of play at the end of the day. Galley worktop sub-layer in place with the holes cut for the sink and tap. The cooker box in place and with some of the framing installed. the most useful tool in shot is the red right-angle gearbox for the drill. It allows you to drill round corners and means that the holes in the worktop under the side deck can be drilled and countersunk at the right angle.

And why would you want a gimballed cooker on a motorboat?

Answer: Well, if you've ever been on a Fairey, anchored somewhere nice and then you find she's sitting sideways to wherever the swell is arriving from, you'll need somewhere to put your mug of tea so it doesn't spill - wedged in the pan holders on top of the galley stove. It also works for G&T's

[Now Playing: Welcome To The Machine by Pink Floyd]


Tuesday 17 May 2011

Time for Thought.

At the end of week 5 (I think), the margins are in place, the remedial glass work has been done on the cabin/deck seam and the steam box has been constructed.

The photo shows the foredeck with all the margins screwed down and the rebates cut (by hand using a shoulder plane from Axminster)

The big gap in the port king-plank will eventually be filled with a 40mm thick lump of teak, on top of which will sit  the anchor winch.

Unfortunately, due a slight teething problems with the steam-box, I had trouble bending the first deck strake into position. It should appear on the left of the photo above, but...

...but hey, Edison spent years discovering ways of not making light bulbs. I think that what I thought would be the hot end of the steam-box is actually colder than the cold end. I have to wait for 'er-indoors to go to Waitrose so I can borrow the jam making thermometer.

Time for thought. For the moment, I'll work on glueing down the margins and working on a jig so the strakes can be bent into position without damaging what I've done already. If you look closely at the photo, you'll see the outlines of the old planks in the subdeck; it's quite a curve - about 12" of edge-set over 8 feet of plank. (that's 300mm over 2.4 metres in new money.)

[Now Playing: Taking Over Me by Evanescence]

Tuesday 10 May 2011

Steam Up

With the teak deck margins laid, its time to look at how to steam the main deck strakes.

Each strake is 45mm wide with a 5 x 5mm rebate down one edge. At the mid-deck point and further aft, its possible to apply the set to the strake by hand - except you need a few more hands to be able to clamp it down and then fix it with glue and screws.

The fore-deck requires much more of a bend, so steaming seems the only way forward.

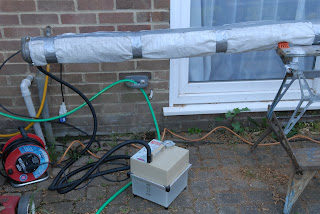
Scratching around the junk-yard which is my garden and garage; an old plumbers roof-rack storage tube was located along with some old blankets and curtains. Some gaffer tape from Maplin and the lagging is easily wrapped around the tube to keep the heat in.

To connect the wallpaper steamer, a short 1/4 BSP adaptor was machined up and fitted to one end of the tube arrangement. Two supports were fitted inside the tube to support the strakes and keep them out of the condensate while they bake.

The test firing was successful with only a couple of minor mods required for production use. And don't forget to unwind all the cable from the extension lead to stop it from overheating. The wall paper steamer is about 2KW and draws about 8 amps...

[Now Playing: "Steam" by Peter Gabriel]

Thursday 28 April 2011

Plugging away


It doesn't take very long when cutting out the various margin pieces of a teak deck before you're knee deep in offcuts. Of course, some of the pieces are large enough to keep for later, but as the bits get ever smaller, sooner or later they finish up in the bin. Which is irritating. I can't stand throwing anything away.

It also became apparent that the 400 brass screws I'd bought to fix the deck pieces down with, were fast disappearing - into the deck. Each one requiring its hole counterboring and then plugging. Checking out the price of 3/8" diameter teak plugs, they are currently working out at 5 or 6 quid a hundred.

So the current regime is, having purchased a 3/8" Veritas plug cutter from The Axminster Tool Centre, an hour each evening is spent cutting plugs out of scrap teak and storing them in a tub. Its amazing how small a piece of teak you can get a plug out of if you're really tight like me. I can cut about 50 an hour, so it'll take a week or so and there's nothing on the telly at this time of year.

[Now Playing: "Layla (unplugged)" by Eric Clapton]

Tuesday 26 April 2011

Teak Deck - end of week two

So with the foredeck margin boards in place, work moves to the blunt end of the boat.

The aft deck layout is quite busy, with cleats, davit bases and the stern ladder all to work around. (The original layout didn't have Davits, but did have quarter rails.)

This is the first time the stern ladder rails have been fitted to the hull since about 2005.

You can see from the cleats in the photo that there is a fair camber to the deck ( there's a bit of distortion from the 17mm lens ), therefore the davit bases will need to be wedged up so that the davits themselves will be upright. Across the diameter of the davit base there's a drop of 12mm - a couple of plywood wedges painted black might work...

Due to a slight miscalculation on the ordering front, I have run out of 90mm wide teak boards. So it's back to Howells and Son for a couple more.

[ Now Playing: Teak Forest Mist by the Thai Elephant Orchestra]

Monday 11 April 2011

Can't put it off any longer

Finally, the weather has set fair enough to make a start on laying the teak deck. The materials are in stock and I think I know what I'm doing.

Unlike most decks, where the king-plank goes in last, the Fairey Huntsman's deck layout requires it to be fitted first. The most expensive bit of wood and you have to get it right first time. It is made up of two pieces of teak 120mm wide and 2 metres long. Specially cut by K.J. Howells and Son of Poole.

The first photo shows progress during day two. The two king-plank boards are screwed down, and the bow margin boards in position awaiting profiling to the bow shape. As I've nowhere to put the bow rail and it's required to hold up the tarpaulin frame, I'll be working round it.

The second photo is a closeup of the marking gauge needed to find the edge of the deck under a 9mm thick teak plank. It picks up the edge of the rubbing strake and marks the edge of the deck and also the 75mm margin board width. Due to the fact that a 40 year old rubbing strake is not the most reliable positioning agent, the marking gauge is adjustable. The most important aspect of the device is the plastic DALEK fitted to the top of the pencil. It stops the pencil from rolling off the deck every time you put it down. (For the record, I have a TARDIS on my other pencil).

The next job is the margin boards around the edge of the deck and various deck fittings so I hope this weather holds for a while longer.

[Now Playing: "Slow Down" by the Teak Project]

Monday 4 April 2011

Slaving over a Galley Worktop

Something other than the windscreen and accessories for once: Progress has been made on the Galley. The photo shows the beginnings of the template for the worktop.

Because the boat lies bow down and leaning over to starboard, the only datum is the bottom face of the worktop, picking up the old support cleats on the bulkheads.

The template is made from some well travelled 4mm plywood which had been around the world and was part of the packing case for my lathe, so has been from Scandinavia to China and back to the UK.

Ripped into strips about 4 inches wide, a reasonably accurate template can be created which will be used to mark the bottom face of the 12mm plywood which will form the final worktop. The template will also hold the bevel markings to ensure a good fit against the angle of the hull

The hole on the left will house the sink, and the stove will be fitted into the gap to the right. There's still more work to do on the template - I still can't decide exactly where the stove needs to be. The 3D computer model says one thing and the Real World says something else.

With the template in place, it's also easier to work out where some of the framing will go.


[Now Playing: "Come on in my Kitchen" by Simply Red.]


Tuesday 29 March 2011

Drivers Eye View

Almost looking like a working boat (I said almost).

The GRP instrument console has been painted; most of the instruments are installed (including a custom built boost gauge); The destroyer wheel has been modified to fit the spline steering box and awaits its leather rim cover.

Still a few holes to fill: The Log and Autopilot control heads will attach to the bulkhead; bottom right will house the stop cables, bottom left, the horn button (when I can find it - I bought a new one and put it somewhere safe!); in the middle where the Sumlog used to be, there'll be a Fairey wheel badge and I still need to build the other boost gauge (a story for another day).

If you look closely, you'll see the panel trim stuff. Looks great, but moves the console back just far enough to foul the steering wheel hub . Another mod to do.

[Now Playing: Signs of life, by Pink Floyd]

Monday 14 March 2011

Old Kent Road Part 2

It's finally installed - apart from wiring.

The support strut is fitted and the serial number ID plate.

The sealant needs trimming with a scalpel, but work now moves onto the instrument panel and bulkhead. Hope this settled weather holds.


[Now Playing: Spinning Around - Kylie Minogue]

Monday 7 March 2011

Starboard Steer Board

"Mirak" is finally reunited with her Starboard Rudder assembly.

The photo shows a closeup of the Butyl Rubber glop used to seal the bottom bearing into the hull. What it doesn't show is the hole needed in the drive to allow the assembly to line up with the hole in the hull. (see the photo album for that.)

As Mirak has two left hand propellors, the starboard rudder has a trim tab fitted to cancel the load on the Whitlock torque rod steering gear.

Anorak Alert: The term Starboard is believed to derive from the original name for a rudder, Steer Board, which was just an oar lashed to the right hand side of a boat or ship.


Saturday 26 February 2011

The Old Kent Road - Part 1

Blimey; will it ever stop raining? I managed 45 minutes on the boat this week rubbing down some filler and applying a coat of paint before it got dark and I repaired indoors to the workshop.

This week's workshop job has been to assemble the Kent Rotary Screen. (That's the spinning piece of glass which serves as a windscreen wiper). The Huntsman 31 screen is curved right in front of the helmsman, so Faireys came up with the idea of mounting the Kent on a GRP fairing instead of fitting the Kent straight onto the perspex screen at a funny angle.

Unfortunately, the old seal was well past it's sell-by-date and no one holds spares any longer. Thankfully Seals Direct came up with two neoprene sections which, when bonded together mimic the old seal profile quite well. They also supplied the waterproof contact adhesive.

The two neoprene sections were carefully bonded together; the fairing was rubbed down and resprayed; the Kent chromed surround was polished and then bonded to the GRP fairing using the same glue and the new seal was then trimmed and fitted.

All that remains is to fit the fairing assembly to the windscreen and then fit the motor and round glass screen. That's the job for Sunday - if it stops raining.

Sunday 6 February 2011

Console Yourself


Another New Year and its February, not sure what happened to January.

My February resolution is to post more often.

First boat restoration day of 2011 was spent finalizing the machining work on the Instrument Console. This is a glass fibre moulding on the Huntsman 31, with moulded rings where the instruments sit. It also holds the throttle/gear morse controls and the stop cables. Add a hole for the horn (sound signalling device) button and four more for the warning lights, and we're ready for a couple of coats of paint.