Monday, 23 May 2011

Err; The Computer says "Yes".

The weather was a bit unsettled for working on the deck and I'm still waiting for some materials to be delivered, so attention is turned to the galley fit out.

Some time back, I generated a 3D computer model of the galley (see the photo album link) to gain some visual idea for the final result and to try out various changes without major expense.

I had wanted to gimbal the cooker and to allow for a 10 degree swing either way, the cooker surround needed to be a lot bigger than originally fitted.

At 10 degrees (the maximum I could work in) the computer model suggested that the cooker surround (the big box in the middle of shot) would foul the hull around the chine log. Sure enough, when moving the box into position it stopped short by about 30mm. The box was removed and a 50 x 50 bevel planed off the bottom corner allowing the box to be fitted in its correct position.

Of course I now need to fill in the hole and fit the framing, but it's nice when the computer is right for once :-)

The photos shows the state of play at the end of the day. Galley worktop sub-layer in place with the holes cut for the sink and tap. The cooker box in place and with some of the framing installed. the most useful tool in shot is the red right-angle gearbox for the drill. It allows you to drill round corners and means that the holes in the worktop under the side deck can be drilled and countersunk at the right angle.

And why would you want a gimballed cooker on a motorboat?

Answer: Well, if you've ever been on a Fairey, anchored somewhere nice and then you find she's sitting sideways to wherever the swell is arriving from, you'll need somewhere to put your mug of tea so it doesn't spill - wedged in the pan holders on top of the galley stove. It also works for G&T's

[Now Playing: Welcome To The Machine by Pink Floyd]


Tuesday, 17 May 2011

Time for Thought.

At the end of week 5 (I think), the margins are in place, the remedial glass work has been done on the cabin/deck seam and the steam box has been constructed.

The photo shows the foredeck with all the margins screwed down and the rebates cut (by hand using a shoulder plane from Axminster)

The big gap in the port king-plank will eventually be filled with a 40mm thick lump of teak, on top of which will sit  the anchor winch.

Unfortunately, due a slight teething problems with the steam-box, I had trouble bending the first deck strake into position. It should appear on the left of the photo above, but...

...but hey, Edison spent years discovering ways of not making light bulbs. I think that what I thought would be the hot end of the steam-box is actually colder than the cold end. I have to wait for 'er-indoors to go to Waitrose so I can borrow the jam making thermometer.

Time for thought. For the moment, I'll work on glueing down the margins and working on a jig so the strakes can be bent into position without damaging what I've done already. If you look closely at the photo, you'll see the outlines of the old planks in the subdeck; it's quite a curve - about 12" of edge-set over 8 feet of plank. (that's 300mm over 2.4 metres in new money.)

[Now Playing: Taking Over Me by Evanescence]

Tuesday, 10 May 2011

Steam Up

With the teak deck margins laid, its time to look at how to steam the main deck strakes.

Each strake is 45mm wide with a 5 x 5mm rebate down one edge. At the mid-deck point and further aft, its possible to apply the set to the strake by hand - except you need a few more hands to be able to clamp it down and then fix it with glue and screws.

The fore-deck requires much more of a bend, so steaming seems the only way forward.

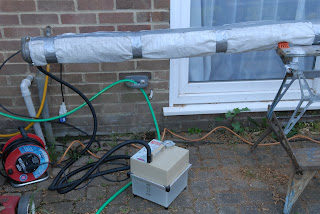
Scratching around the junk-yard which is my garden and garage; an old plumbers roof-rack storage tube was located along with some old blankets and curtains. Some gaffer tape from Maplin and the lagging is easily wrapped around the tube to keep the heat in.

To connect the wallpaper steamer, a short 1/4 BSP adaptor was machined up and fitted to one end of the tube arrangement. Two supports were fitted inside the tube to support the strakes and keep them out of the condensate while they bake.

The test firing was successful with only a couple of minor mods required for production use. And don't forget to unwind all the cable from the extension lead to stop it from overheating. The wall paper steamer is about 2KW and draws about 8 amps...

[Now Playing: "Steam" by Peter Gabriel]